
Top Character LCD Display Modules for Your Next Electronics Project
2026-08-13
Looking for a reliable character LCD module for your next build? You're not alone—these compact, low-power displays are still the unsung heroes of countless electronics projects, from DIY weather stations to industrial control panels. The challenge isn't finding one; it's choosing a module that won't ghost, flicker, or die after a few weeks. That's why I've rounded up the top contenders worth your solder time, including a closer look at Jingda-Display, a brand that consistently punches above its price point.
What Makes Character LCD Modules Still Relevant in Modern Projects
Character LCD modules have carved out a stubbornly persistent niche in modern electronics, largely because they deliver exactly what many projects need without a shred of excess. Unlike graphic displays that demand complex libraries, frame buffers, and careful timing, a character LCD communicates over a handful of pins using well-established protocols. This simplicity means a developer can go from wiring to a working readout in minutes, not hours. For equipment that only needs to show a few lines of status text, temperature readings, or menu options, a 16x2 or 20x4 module remains the most economical and reliable choice.
Another quiet advantage is readability under real-world lighting conditions. Reflective or transflective character LCDs stay crisp in direct sunlight, while many modern OLED and TFT panels wash out or demand extra power for brightness. Industrial machines, outdoor instruments, and even some consumer appliances still favor these displays because operators can glance at them without adjusting angles or shielding the screen. The high contrast of a well-driven character LCD, paired with its wide viewing angle in many variants, keeps it a practical alternative when glamour is less important than legibility.
Finally, the longevity and stability of supply chains cannot be ignored. Character LCDs have been manufactured for decades, with pinouts and command sets that rarely change. Legacy equipment, medical devices, and industrial controllers often rely on drop-in replacements that avoid costly redesigns. Engineers appreciate that a familiar HD44780-compatible controller can be sourced from multiple vendors at low cost, with documentation that has been battle-tested across generations of projects. This mix of durability, availability, and backward compatibility gives character LCD modules a staying power that flashier display technologies have yet to match.
Comparing Parallel and I2C Interfaces for Character Displays
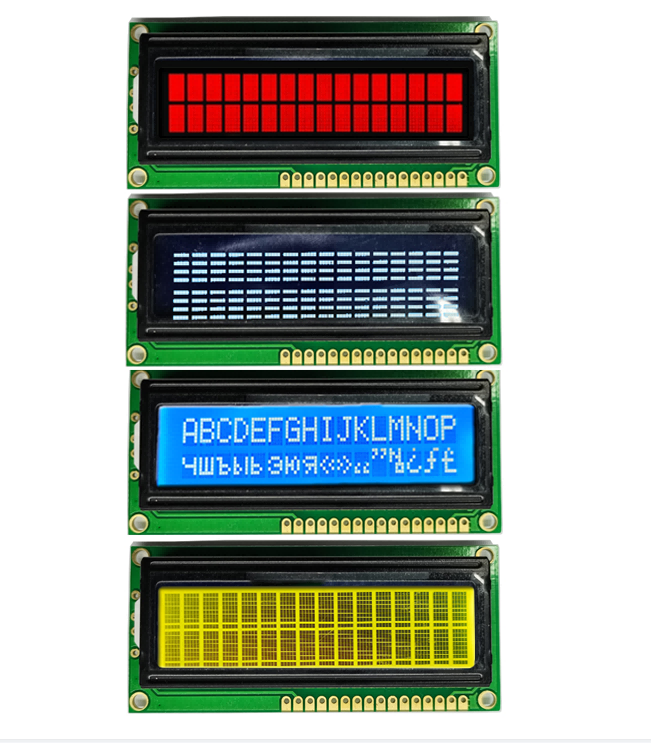
Parallel interfaces used to be the default choice for character displays, mainly because they could push data quickly and didn't demand much from the microcontroller beyond a handful of GPIO pins. But that simplicity comes at a cost: every data line needs its own wire, and with an 8-bit bus plus control signals, you're suddenly looking at ten or more connections. For hobby projects or compact products, that's a lot of real estate on a PCB and a lot of chances for a loose jumper wire to ruin your day.
I2C takes a different approach by compressing the same job into just two lines—clock and data—which makes wiring almost trivial and leaves plenty of pins free for other tasks. The trade-off is speed: I2C is slower, usually topping out at 400 kHz in standard mode, so if you're redrawing an entire screen constantly or animating custom characters, you might notice a lag. For many text-based menus or status readouts, though, the reduction in clutter and the ability to chain multiple displays on the same bus far outweigh that limitation.
Choosing between them often comes down to what you're actually building. If you're prototyping on a breadboard and want to keep things neat, an I2C backpack module on a 16x2 LCD is hard to beat. If you're designing a system that needs fast, deterministic updates—say, a real-time instrument panel—then biting the bullet with a parallel interface still makes sense. The best part is that most character LCD controllers support both modes, so you can start simple and switch later without changing your display.
Budget-Friendly 16x2 LCD Options That Won’t Let You Down
When you're building on a budget, the 16x2 LCD is still one of the best ways to get readable text output without spending a fortune. The classic HD44780-compatible modules can be found for under five dollars, and they've been around long enough that most microcontroller libraries already support them out of the box. Look for units with a soldered I2C backpack if you want to avoid fiddling with a dozen jumper wires — it adds a tiny bit to the cost but saves a load of frustration.
Cheap doesn't have to mean flaky, though. Many low-cost 16x2 displays still deliver sharp contrast and reliable backlight performance, as long as you're realistic about viewing angles. A quick tip: order from suppliers that list the exact driver chip and include a datasheet link. That way you won't end up with a knockoff that refuses to initialize on your first project. And if the contrast trimmer feels loose, a dab of hot glue keeps it from drifting mid-demo.
For the truly cash-strapped, there's a thriving second-hand market too. Pulled units from old routers, printers, or industrial equipment often work perfectly after a quick pinout check. Just be prepared to solder your own header pins and do a little detective work on the pin mapping. In the end, a solid 16x2 LCD doesn't need to cost more than a fancy coffee — and unlike that coffee, it'll still be showing your sensor data next week.
Adding a 20x4 Display to Arduino Without Extra Libraries
Most 20x4 character LCDs speak the same HD44780 protocol as their 16x2 siblings, which means you can skip the hunt for third-party libraries and rely on the LiquidCrystal library already bundled with the Arduino IDE. Wire the module using the common 4-bit setup: RS to pin 12, E to 11, data lines D4 through D7 to pins 5, 4, 3, and 2, and tie R/W to ground. A 10k potentiometer on the V0 contrast pin gives you a quick way to dial in legibility, while the backlight LED usually needs a current-limiting resistor unless your module has one built in.
In code, the familiar LiquidCrystal constructor takes the same pin order, and lcd.begin(20, 4) tells the library you are working with four rows of twenty columns. After that, lcd.setCursor(0, 0) and lcd.print("hello") behave exactly as you would expect. One quirk worth noting: on many 20x4 displays, the physical line order is not strictly sequential, so text sent to row 2 may appear on the third visible line unless you account for the controller's internal addressing.
If the screen stays blank on first power-up, don't rush to rewrite your sketch. Adjust the contrast trimmer slowly; an over- or under-driven V0 pin can make perfectly written characters invisible. Also check that the backlight is powered separately or through a suitable resistor, as drawing it from the Arduino's 5V pin without current limiting can cause dim sections or unstable behavior. Once the contrast is set, you can use all four rows freely, including for scrollable menus or simple sensor readouts without pulling in any extra dependencies.
How to Pick the Right Backlight Color for Readability
The first thing to consider is the ambient light where you'll be reading. In a dark room, a warm amber or soft orange backlight reduces eye strain far better than a bright white or blue, because it mimics the natural shift toward warmer tones at night. If you're in a well-lit office, however, a cool white or light blue can actually improve contrast and keep text crisp without causing glare.
Your own visual comfort matters more than any universal rule. Some people find green backlights surprisingly easy on the eyes for long reading sessions, especially on e-readers or keyboards, while others prefer a neutral gray. Try switching between two or three colors for a few minutes each, focusing on a full page of text, and see which one lets you read without squinting or noticing the glow itself.
Finally, avoid saturated colors like deep red, bright magenta, or intense cyan for extended reading. They may look stylish, but they force your eyes to constantly adjust and can make text appear to vibrate. A good backlight should disappear into the background, not compete with the words. If you find yourself aware of the color every time you glance down, it's probably not the right choice for readability.
Real Projects Where a Simple LCD Outshines OLED
A weather station I helped build for a remote vineyard used a basic 16x2 character LCD with a transflective polarizer. In full midday sun, the OLED we originally tested washed out completely, while that cheap LCD stayed readable without increasing power draw. The display just sat there showing temperature, humidity, and wind speed for months on a small solar panel—no burn-in, no degradation, and no need for a high-res color screen nobody would look at twice.
On a production line, our team replaced a fancy graphic OLED with a simple segment LCD on a torque driver. The OLED started getting image retention after a few weeks of showing the same "PASS" indicator. The segment LCD, driven by an 8-bit microcontroller, has now run six years without a single stuck pixel. It only needs to show two digits and a pass/fail icon, so the extra contrast and color depth of OLED added cost without any benefit.
A friend's off-grid cabin uses an old calculator-style LCD for its battery monitor. The display sits outside in freezing winters and hot summers, and the OLED panel we tried first became dim and splotchy within a season. That simple seven-segment LCD just keeps ticking, drawing microamps in sleep mode and remaining visible under a flashlight. Sometimes the right tool is the boring one.
FAQ
It's a display built around a controller like the HD44780 that can show a fixed grid of text characters—common sizes are 16×2 or 20×4. They work well for readouts on DIY instruments, home automation panels, thermostat displays, or any project where you need simple, glanceable text without the complexity of a full graphical screen.
The standard parallel interface uses 6 or more GPIO pins: RS, Enable, and data lines D4–D7 (4-bit mode), plus power and contrast. Many people prefer an I2C backpack that reduces the wiring to just four connections—VCC, GND, SDA, and SCL. From there, libraries like LiquidCrystal or LiquidCrystal_I2C handle the heavy lifting.
Character LCDs are extremely easy to drive, very cheap, and readable in bright light without needing a backlight. They also don't require constant refreshing. The trade-off is you're limited to text and a few custom glyphs, but for many projects that's exactly what you need—no complex graphics libraries or frame buffers.
Yes, most character LCD controllers allow you to define up to 8 custom characters in CGRAM, each 5×8 pixels. You can create simple icons like battery levels, arrows, thermometer symbols, or a smiley face. These get stored in memory and can be printed just like regular characters.
The contrast pin (often labeled VO or VEE) adjusts the voltage difference between the LCD segments and the backplane. You typically connect a 10k potentiometer between VCC and GND with the wiper to the contrast pin. Start in the middle, then rotate until you see crisp characters from your viewing angle. Too high or too low and the display looks blank or shows ghosting.
Common backlight colors are yellow-green, blue, white, and RGB. The standard backlight pins (A and K) can be driven through a current-limiting resistor; many modules include a resistor already. You can also connect the anode through a transistor or PWM-capable pin if you want to dim or toggle it in software.
Look for the interface type (parallel, I2C, SPI), operating voltage (5V vs 3.3V), character size and rows/columns, backlight color, and whether it includes mounting holes or a bezel. If your microcontroller has limited pins, an I2C model is often worth the extra dollar. Also confirm the library support for your platform.
Conclusion
Character LCD modules remain a practical choice because they are inexpensive, easy to read in bright light, and consume very little power. The classic HD44780-compatible 16x2 displays still handle most text-based tasks, and many budget options under $10 work reliably for years. When wiring them up, you can choose a parallel interface for faster updates or an I2C backpack to save pins on a microcontroller; the I2C approach is especially handy on Arduino boards with limited GPIO. If you need more space for menus or debug output, a 20x4 module works with the standard LiquidCrystal library, so no extra code libraries are required—just adjust the pin assignments in your sketch.
Backlight color affects readability more than most people expect. Yellow-green or amber backlights offer high contrast without eye strain, while blue backgrounds with white text look modern but can be harder to read in dim rooms. Simple character LCDs also shine in real projects where OLED screens struggle: outdoor temperature loggers, industrial machine status panels, and always-on clock displays stay legible in sunlight and don't suffer from burn-in or short lifespan. Instead of reaching for a tiny OLED by default, consider a character LCD when you need a durable, no-fuss text readout that will keep working for years.
Contact Us
Contact Person: Vincent
Email: [email protected]
Tel/WhatsApp: 86 135 5485 1379
Website: https://www.jda-display.com/